Stucco is a beautiful and durable material for exterior walls. It comes in many styles and can be applied to wood or block-framed houses.
A good stucco contractor will examine your home to ensure no hidden issues could damage the new stucco. This involves a thorough examination of your landscaping and interior openings like windows. Contact Dryvit Stucco Installation now!
Stucco is a highly durable and energy-efficient material, but it requires frequent maintenance to keep it looking its best. Stucco also tends to absorb and hold moisture, which can lead to color instability and rot. The proper installation of a water-resistive barrier, lath, and stucco wrap minimizes these issues.
Before the first coat of stucco is applied, the surface should be cleaned to remove loose dirt and debris. Any paint that is peeling or flaking should be removed, as well. Stucco contractors may also use this opportunity to re-seal areas that are leaking or showing signs of decay.
After cleaning and sanding, the substrate is ready for the first coat of stucco. This layer, known as the scratch coat, is made from a mixture of 1 part plaster mix to 2 1/4 parts cement and 4 parts fine aggregate. Adding lime to this mix creates a stronger material that can withstand some amount of movement without cracking. This scratch coat is troweled evenly onto the substrate and allowed to cure for at least 36 hours.
Once the scratch coat has cured, the installer will apply a second layer of stucco. This second coat is called the brown coat and functions as a strengthening layer. This coat is troweled and texturized using various tools to achieve the desired texture or pattern. The final coat of stucco is allowed to dry for at least 36 hours and misted occasionally to promote strength and slow drying.
Stucco contractors will integrate flashing at all penetrations to help protect the wall from moisture. This includes the roof eaves, where kick-out flashing is recommended, and the windows and doors, which require pan flashing at the sills and Z-flashing with end dams at heads.
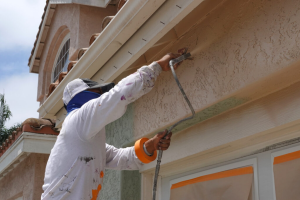
Primer
Stucco is a durable, beautiful material that safeguards your home against the elements. Although it is a great choice for your home, stucco can crack or crumble over time, requiring periodic maintenance to keep it in good condition. One of the most important steps in this process is priming your stucco. This step is not only essential to achieving a beautiful, lasting paint job; it also helps protect the stucco surface from moisture and other damage.
Using a premium primer, like DRYLOK, ensures that the stucco surface will accept paint properly. A quality primer will help the paint adhere to the surface and allow it to dry quickly. This is especially important because stucco can be very porous, which can lead to uneven distribution and deterioration of the paint surface over time. A primer will seal these pores, ensuring that the paint will not be able to absorb into them.
After the primer has been applied and allowed to dry completely, the scratch coat can be sprayed onto the surface of your home. This layer, which consists of Portland cement and sand, will form the base for the final, decorative finish. After the scratch coat has cured, the brown coat can be troweled or floated over it. This layer smooths the surface and provides a foundation for the texture and color of the stucco.
If you are planning on painting your stucco, it is best to schedule the work in fall. This allows the walls to dry fully before the onset of summer, when temperatures can cause stucco to crack and degrade. A contractor will also be able to schedule the project around local weather conditions, as rain and strong winds can slow the drying process.
Second Coat
The second coat is called the brown coat and is usually made of sand and cement. It is applied to the lath with a trowel and then sprayed or rolled with a brush. This coat helps the first coat adhere to the wall and gives it a textured appearance. It is also used to cover any areas that were exposed by the lath and wire. It is important that this coat is thoroughly rubbed and smoothed as well.
Once the brown coat has cured, you can add details like windows, doors, cornice and other trim pieces to the structure. You should always ensure that these are fully embedded into the stucco before painting it. It is also a good idea to paint these accents in the same color as the brown coat.
This is a time-consuming and labor-intensive process that should only be completed by experienced stucco contractors. It is also very expensive, but it provides a beautiful, textured look and helps to protect the home from natural hazards. However, it isn’t as effective as EIFS at reducing energy bills, and it has a relatively low insulation factor.
Stucco is a durable, versatile material that offers many customization options for homeowners. It can be installed on the exterior of homes and buildings, and it is resistant to moisture, fungus and insects. In addition, it can increase the resale value of the home and protect the interior from damage. However, stucco requires regular maintenance and is prone to cracking. To avoid this, you should consult a professional to ensure that it is installed correctly and in the correct weather conditions. Additionally, you should avoid touching or stepping on the surface as it will be wet.
Third Coat
The third coat is the traditional textured stucco that gives the wall its aesthetic appeal. This coat can be tinted and textured in a variety of ways. It is also coated with an acrylic finish to protect it from blunt damage and add waterproofing. The acrylic finish can be tinted to match the color of the stucco or to complement it.
The three-coat system is the most durable and versatile type of stucco available today. It is generally used over frame construction and may be applied to solid substrates such as concrete masonry or cast-in-place concrete if lath is not being utilized. The three-coat system requires more labor upfront than a two-coat or one-coat system but is known for its longevity and aesthetic qualities.
A three-coat stucco system starts with a paper and wire coat, which is a water resistant barrier and a layer of wire mesh that provides a base for the following coats to adhere to. This layer is essential in preventing moisture and mold from entering the building. It must be installed according to the manufacturer’s recommendations and ICC-ES report requirements.
Once the paper and wire coat is in place, the scratch coat is applied. This is a mixture of sand, cement and reinforcing fibers that is applied to the wire lath. It is then scratched horizontally to create a rough surface for the brown and finish coats to bond with.
After the scratch coat is applied, the brown coat is applied. This is a more even layer than the scratch coat and is the key to providing an even base for the next coatings. The brown coat must be cured for 24 hours before the texture or finish can be added. It is recommended that the brown coat be covered or misted with water several times each day to keep it damp and promote curing.
Finish
Whether you’re building a new home or remodeling an existing one, stucco is a durable and beautiful finish that can add curb appeal and value. It also provides internal moisture and temperature protection to prevent leaks and mold growth.
Stucco is traditionally applied over wood-frame walls, but it can also be used on concrete, block, or brick structures. It’s best for exterior walls, but can be used indoors as well. Stucco is a mixture of Portland cement, lime, sand and water that is applied wet and then hardened to create a strong, weatherproof surface.
A contractor will apply traditional stucco in a three-coat process, beginning with a “scratch coat.” This rough layer is added to the sheathing to help it adhere to the next coat. This is followed by a second coat that adds strength to the wall. Then a specialist will hand-trowel the final coat to create a custom surface texture.
To reduce the risk of cracking, contractors install control joints in the wall to separate the sheathing into rectangular panels no larger than 144 square feet. They may also use a Driwall rain screen to improve the wall’s ability to dry.
Once the brown layer is dry, it’s time to apply a final 1/8 inch (3 mm) coat of stucco known as the finish coat. This coat can be tinted to match your home’s color scheme. It’s important to allow this coat to cure fully before applying paint.
Before the finishing coats are applied, contractors make sure the sheathing is properly cleaned and treated with a bonding substance or stucco wrap. This is essential to a successful finish. It’s also a good idea to remove paintings, rugs and other items from the area around your walls or ceiling.